


If you’re wondering how to prepare yerba mate, the traditional method is simpler than most people think. But there isn’t only one way to make it.
In this guide, I’ll show you how to make yerba mate the traditional way using a gourd and bombilla. Then, I’ll also cover easier alternative methods, including how to prepare yerba mate in a French press, teapot, and coffee maker.
Let's first start with what you'll need.
What You Need to Prepare Yerba Mate
To prepare yerba mate the traditional way, you only need a few basic items: loose-leaf yerba mate, a mate gourd, and a bombilla. Each piece plays an important role and choosing these items correctly will affect your overall experience.
Mate Gourd
There are many types of mate gourds (also just called a mate), but traditionally, they're made from a natural calabash plant. If you want to go the traditional route (recommended) you’ll need a calabash gourd.

Calabashes have been used for centuries, starting from the indigenous tribes of South America. They produce a drinking experience like no other and add a natural touch. But you will need to learn how to cure a mate gourd as there can be leftover plant material that can make your mate taste more bitter.
For lower maintenance, stainless steel gourds are better because they don’t require curing, are simple to clean, and are less likely to develop mold if you forget to dry them perfectly.
If you’re just learning how to prepare yerba mate, either option can work. Choose a calabash gourd if you want the classic South American ritual, or start with a stainless steel mate gourd if you want an easier start.
Browse our mate gourds collection to find a gourd that fits your style and experience level.
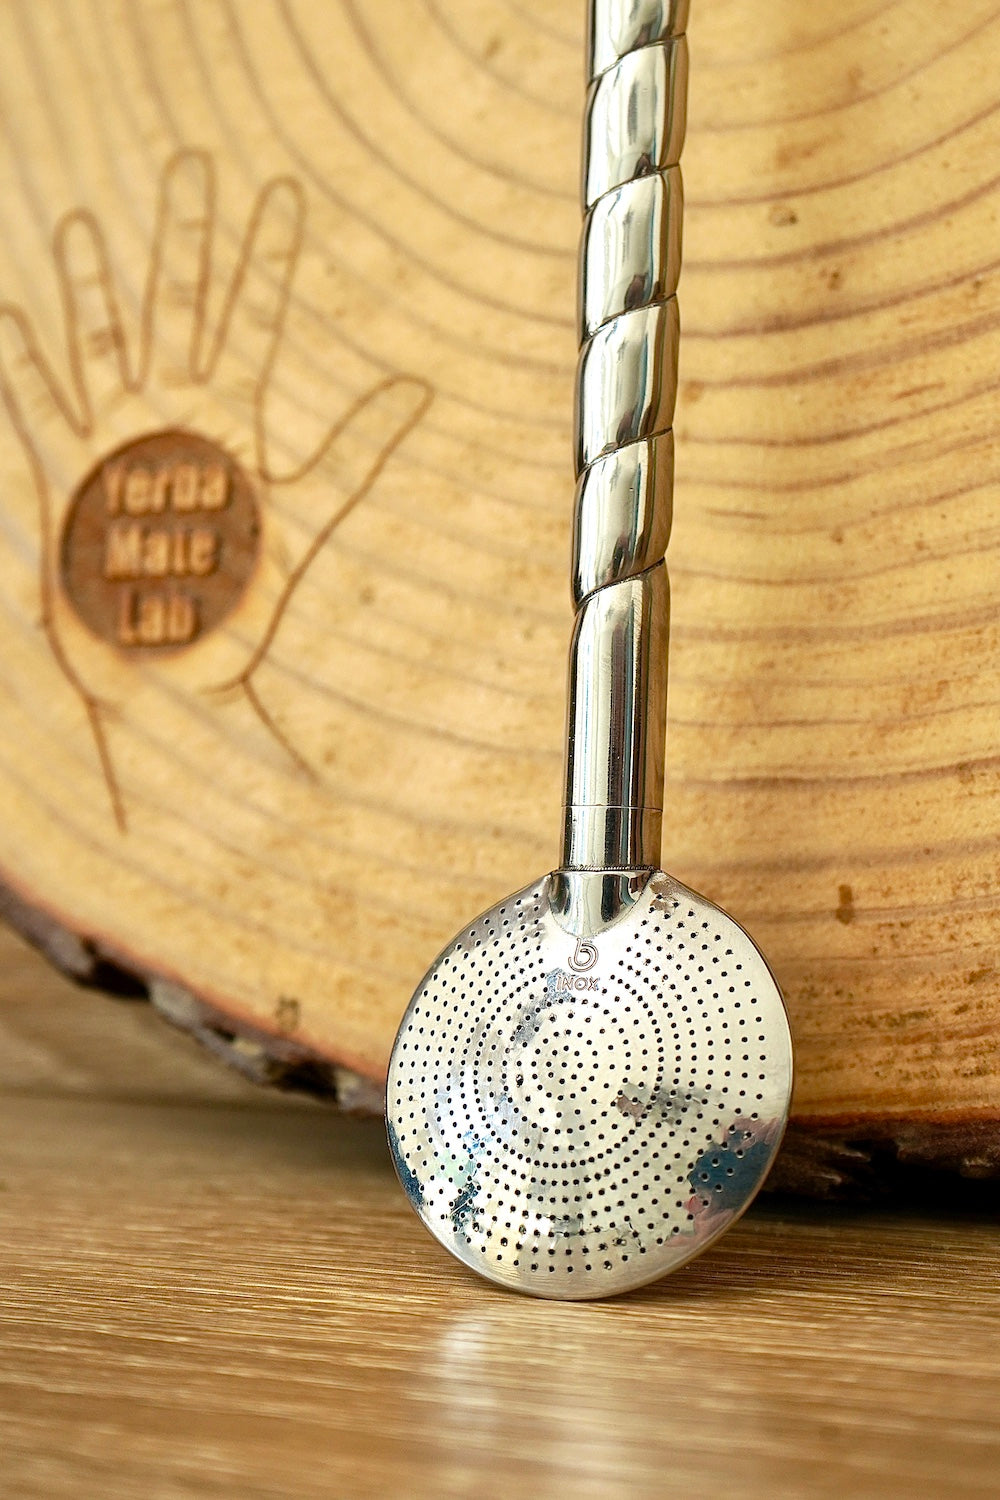
Bombilla / Straw
A bombilla is the metal straw used to drink yerba mate. It has a filter at the bottom that lets you strain the yerba as you take a sip.
This is what makes traditional yerba mate different from regular tea. You don’t steep the leaves and remove them. Instead, the yerba stays in the gourd, and the bombilla filters each sip as you refill with hot water.
There are many types of bombillas, but from our experience, a spoon bombilla is usually the easiest to start with. They filter the best, are less likely to clog, and works well with every cut of yerba.

If you’re learning how to prepare yerba mate the traditional way, a good bombilla is just as important as the gourd itself. Browse our bombillas collection to find one that fits your setup.
Yerba Mate
Yerba mate is the loose-leaf herb used to prepare the drink. It comes from the leaves of the Ilex paraguariensis plant and is made up of three components - leaves, stems, and dust/powder.
The type of yerba mate you choose will determine the cut and flavor. Some yerbas are smooth and grassy, while others are stronger, smokier, more bitter, or more intense. For starters, it's usually better to start with a more mild yerba that's also coarser in cut so it's easier to prepare.

A brand we always recommend beginners to start out with is Cruz De Malta. It's smooth, woody, and nutty in taste.
Now that you got everything you need, let’s finally learn how to prepare yerba mate.
How To Prepare Yerba Mate The Traditional Way
Unlike regular tea, yerba mate isn’t steeped once for a few minutes and removed. Instead, the yerba stays in the gourd while you drink and refill it over and over until it loses flavor.
Here’s how to make yerba mate the traditional way, step by step. You can either watch our video tutorial or read the steps below.
Step 1: Fill Your Gourd With Yerba Mate
Start by filling your mate about 1/2 to 2/3 full with yerba. It doesn't have to be perfect, just eyeball it as best you can. If you're using finer-cut yerba, it's best to fill only up to halfway as the yerba will expand once wet and take up a lot more space.

Step 2: Cover, Tilt, & Shake
Cover the top of the gourd with your palm, turn it upside down, and give it a few gentle shakes. This helps move the finer particles toward the top and the larger leaves and stems toward the bottom, which can help prevent the bombilla from clogging.
Next, tilt the gourd back slowly until you have it at a 45-degree angle so the yerba forms a mountain. One side of the gourd should be the yerba stacked up, while the other side has an open space where you’ll pour the water.

Step 3: Add Room Temperature Water
Before adding hot water, pour a small amount of room-temperature water into the empty half of the gourd. Add enough until you touch almost the top of the mountain. This helps form a solid wall of yerba so it doesn't collapse. It's not mandatory but for aesthetics, it helps. At minimum, fill to where you wet at least half of the yerba towards the bottom.
Now, let it sit for 1-2 minutes so the yerba can absorb, swell, and solidify.

Step 4: Insert The Bombilla
Starting from the water side, insert the bombilla until you reach the bottom of the gourd. Then position it under the mountain of mate by pulling the straw towards you. This might take a bit of force so be careful not to be too aggressive or the mountain will tip over. Once your bombilla is under the mountain, the straw should rest firmly against the rim of your gourd. It should not be touched or moved from here.

Step 5: Add Hot Water
Now pour hot water into the same open space where you inserted the bombilla. The water should be hot, but not boiling. Boiling water can burn the yerba, making it taste harsh, bitter, and flat. A good target is around 140–170°F.
Pour slowly and avoid wetting the dry half of yerba. Fill until about half a centimeter below the mountain. This helps the mate last longer and gives you better flavor over multiple refills.
Step 6: Sip & Refill
Once the water is added, drink until you hear a slurping sound. That's how you know it's finished. Then, continue to refill in the same spot.
After pouring, make sure you do not let it steep. The second you refill, you should start sipping. Letting it steep for even a few minutes will make the infusion too strong and bitter. Only after multiple refills will you need to let it steep as the leaves lose most of its flavor by that point.
Common Beginner Mistakes When Preparing Yerba Mate
Yerba mate is easy to prepare once you understand the basics, but small mistakes can make your first time a lot worse than it needs to be. Most beginner mistakes come from treating yerba mate like regular tea.
Using Boiling Water
Boiling water should never be used for mate. It can make your mate taste extremely bitter and is usually the reason most people dislike it when they first try it. Instead, keep your water around 140-170F (60-77C). If it's your first time ever, 140F is best to start.
Coffee, as well as other teas, have different optimal water temperatures to extract the best flavor out of them. Yerba mate is no different.
Moving The Bombilla Too Much
It's a rule to never touch the bombilla once it is set in place. There are some exceptions, but for the most part, once you insert it in your mate, it's best practice to not move it as this can cause the bombilla to clog. This is especially the case for finer cut yerbas.
Filling the Entire Gourd With Water
One of the main benefits of preparing mate the traditional way is that it lasts for many refills. However, if you "flood the mate" and pour to the absolute top or wet the entire mountain, it defeats the purpose.
Obsessing Over A Perfect Mountain Of Mate
A mountain of mate is one of those things every beginner mate drinker loves to aim for. It's pleasing to the eye and gets praise from other materos. But if your enjoyment of the mate itself is sacrificed, it's not worth doing.
A mountain of mate is only beneficial for finer cut yerbas like Uruguayan brands and Brazilian chimarrao. The finer, the easier it is to make one. With coarser cuts, there is no reason to try and make a perfect one.
If you do happen to get a nice mountain and it crumbles, that's normal. You did not do anything wrong. You can remold it back together if you want. But don't obsess over it to the point you get frustrated and longer enjoy your mate.
Ways To Make Yerba Mate Without A Gourd & Bombilla
Although I recommend drinking yerba mate the traditional way and believe it offers the best experience, it’s not the only way.
We're aware some don't want to invest so much upfront in all the equipment. So here are some alternative ways to make yerba mate with things you likely have at home already.
Yerba Mate In A French Press
A French press is one of the easiest ways to prepare yerba mate without a gourd. It works well because it lets the yerba steep freely in the water, then easily strains the leaves when you press the filter down.
To make yerba mate in a French press, add about 1–2 tablespoons of yerba mate per cup of water. Pour in hot water around 150–170°F, then let it steep for 3-5 minutes depending on how strong you want it. Once it’s done steeping, slowly press the plunger down and pour into a cup.
If it tastes too strong or bitter, use less yerba, lower the water temperature, or shorten the steeping time next time. This method is great for beginners because it’s simple, familiar, and doesn’t require a gourd or bombilla. The flavor won’t be exactly the same as traditional mate, but it’s a solid way to try yerba mate before moving into the full ritual.
Yerba Mate In A Teapot
A teapot is another easy way to make yerba mate. This method works especially well if you want to prepare multiple cups at once or serve yerba mate like a traditional loose-leaf tea.
To prepare yerba mate in a teapot, add about 1–2 tablespoons of loose-leaf yerba mate per cup of water. Pour in hot water around 150–170°F, then let it steep for 3–5 minutes. Once it’s finished steeping, pour the yerba mate through the teapot’s built-in strainer or use a separate tea strainer to keep the leaves out of your cup.
Yerba Mate In A Coffee Maker
You can prepare yerba mate in a coffee maker, but it should be treated more like a backup method than the best method.
Add 1–2 tablespoons of loose-leaf yerba mate per cup of water to the coffee filter, just like you would with ground coffee. Then run the machine with water and let it brew into the pot.
The main issue with this method is water temperature. Many coffee makers use water that is hotter than ideal for yerba mate, which can make the flavor more bitter. If your coffee maker tends to brew very hot, use slightly less yerba to keep the taste smoother.
Ready To Prepare Yerba Mate The Traditional Way?
If it’s your first time, expect to make some mistakes. You might pour in water that’s too hot. Your mountain of mate might not look too pretty. And you might position the bombilla incorrectly and suck up bits of leaves.
Whatever it is, don’t worry. Just keep doing it until you get the hang of it. Eventually, you’ll be able to prepare a smooth-running mate each and every time.
If you want to experience yerba mate the traditional way, shop our yerba mate kits to get everything in one beginner-friendly setup!